If you experience any difficulty in accessing content on our website, please contact us at 1-866-333-8917 or email us at support@chicagovps.net and we will make every effort to assist you.

The Windows Subsystem for Linux (WSL) enables users to run Linux applications on Windows without the need to boot into a separate operating system. However, performance can lag compared to native Linux environments. To enhance functionality, it’s recommended to keep the WSL kernel updated, as newer versions incorporate performance improvements and support for modern hardware.
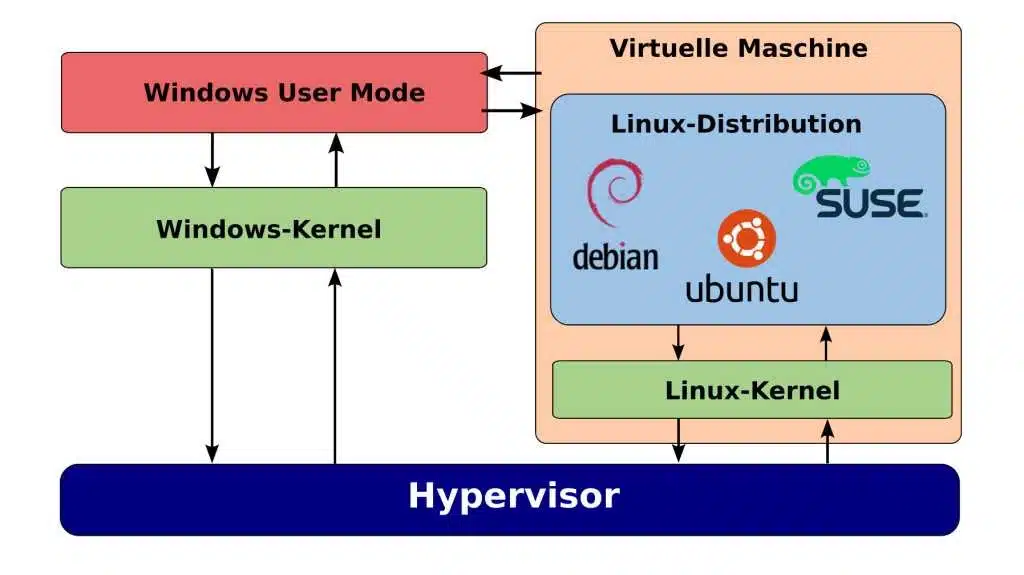
WSL 2 operates with its Linux kernel running on a hypervisor, similar to KVM on Linux systems. This design allows for efficient interaction between the Windows host and the Linux guest, managing resources like memory and CPU usage. Although the kernel is optimized frequently by Microsoft, some hardware drivers may not play a significant role in WSL because the hardware remains virtualized.
To begin using WSL on Windows 10 or 11, first ensure that you have the Windows terminal installed. You can easily install WSL by executing the following command in PowerShell:
wsl --install -d Ubuntu-24.04After installation, you can check the available distributions and their respective versions with:
wsl --list --onlineOnce installed, a Linux terminal opens, notifying you of the installation status. It is important to update your Ubuntu system afterward with:
sudo apt update && sudo apt upgradeTo check which version of WSL you are using, execute:
wsl -l -vIf the version displayed is 1, upgrade it with:
wsl --set-default-version 2wsl --set-default [Distribution]Replace [Distribution] with the name of your installed Linux distribution.
To update the kernel, follow these steps:
Install Developer Packages:Within your WSL terminal, install the necessary development tools with:
sudo apt install build-essential flex bison dwarves libssl-dev libelf-dev libncurses-dev gitDownload the Kernel Source Code:Create a directory and clone the WSL2 kernel repository:
mkdir kernelcd kernelgit clone https://github.com/microsoft/WSL2-Linux-Kernel.git --depth=1 -b linux-msft-wsl-6.6.ycd WSL2-Linux-KernelConfigure the Kernel:To customize your kernel, give it a unique name with:
scripts/config --file Microsoft/config-wsl --set-str LOCALVERSION "-custom-microsoft-standard-WSL2"You can enter the configuration editor for more detailed customizations with:
make menuconfig KCONFIG_CONFIG=Microsoft/config-wslCompile the Kernel:Create the kernel using:
echo 'yes' | make -j $(nproc) KCONFIG_CONFIG=Microsoft/config-wslThen install the modules:
sudo make KCONFIG_CONFIG=Microsoft/config-wsl modules_installFinalize the Installation:Copy the newly created vmlinux file from your Linux home directory to the appropriate Windows directory:
cp vmlinux /mnt/c/Users/[username]/WSL/Create a file named .wslconfig in your Windows user profile folder, entering the following configuration, replacing [username] with your actual Windows username:
[wsl2]kernel=C:Users[username]WSLvmlinuxClose all WSL instances using:
wsl --shutdownWhen you start WSL again, check your kernel version with:
uname -aUpdating the WSL kernel not only enhances performance but also helps in utilizing recent hardware advancements.
ChicagoVPS is your gateway to unparalleled hosting solutions. Our state-of-the-art datacenters and powerful network ensures lightning-fast speeds and uninterrupted connectivity for your websites and applications. Whether you’re a startup looking for scalable resources or an enterprise in need of enterprise-grade hosting, our range of plans and customizable solutions guarantee a perfect fit. Trust in ChicagoVPS to deliver excellence, combining unmatched reliability and top-tier support.
For Inquiries or to receive a personalized quote, please reach out to us through our contact form here or email us at sales@chicagovps.net.
